 Skip to main content Skip to footer
You already know that drilling into porcelain tile is tough. You might have tried it yourself. The extreme hardness of the material makes the job tricky. Using the right tools is the absolute key to success. We will show you exactly how to drill into porcelain tile safely. Our porcelain tile drilling tips will help you achieve clean drilling holes for every tile type every single time.
This guide will walk you through the proper methods. You will learn about selecting the perfect drill bit for hard ceramic and porcelain surfaces. We focus on professional techniques to ensure that no cracking or chipping occurs. This information is vital for any contractor or installer.
Why Is Porcelain Tile So Hard to Drill?
You may wonder why drilling through porcelain tile presents such a challenge. The tile surface is inherently hard, dense, and very smooth. Standard bits for wood or masonry simply will not work.
Porcelain is fired at much higher temperatures than standard ceramic tiles. This process creates a dense, non-porous structure. This is what makes porcelain floor tile so durable. Consequently, this density strongly resists penetration by a regular drill bit.
You risk major damage by using the wrong drill bit. Ordinary bits can slip easily, causing unsightly scratches or dangerously cracked tiles. Glazed, polished, and vitrified tiles are especially difficult to penetrate without the proper technique. You need the right porcelain tile drilling tips and the perfect bit for this type of tile.
Preparation Before Drilling
Preparation is essential for successful drilling through porcelain. This crucial first point minimizes slipping and prevents chipping. You must secure the area before you start drilling the hole.
- Always mark the exact drilling position clearly. Use a permanent marker to define the center of your future hole. You want the location to be precise.
- Next, you should apply cross-shaped masking tape right over the spot. The masking tape provides essential grip for your drill bit tip. It stops the bit from “walking” or slipping off the smooth tile surface. It acts as a guide for starting the hole. A pilot hole is generally not needed with the right tools. Using masking tape and a quality diamond bit is enough.
- Finally, check your drill. You must use a variable-speed drill only when drilling through porcelain tile. Make sure you turn off the hammer action or hammer mode completely. A hammer drill will instantly crack the tile. You must start your drilling at a slow speed.
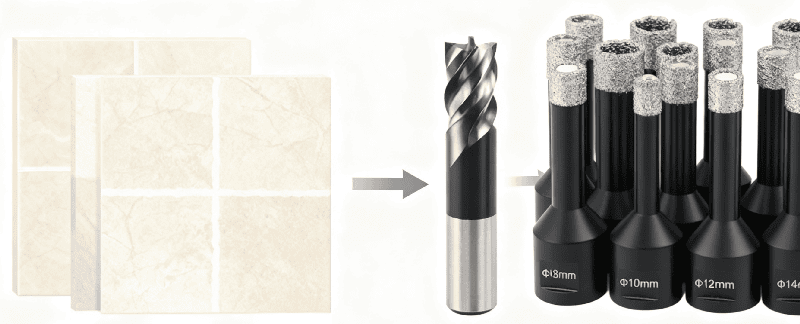
What Type of Drill Bit Is Suitable for Tiles?
Choosing the correct drill bit is the most critical decision. The type of tile you are working with dictates the tool. Standard masonry for putty or wood bits are not an option here.
You have a few choices, depending on the material’s hardness. Let’s review the best options for both ceramic tile drill bits and dense porcelain tile.
Drill Bit Suitability Comparison
| Drill Bit Type | Features | Suitability |
| Carbon/High-Speed Steel | Low cost, not durable | Not Recommended |
| Alloy Drill Bit | Carbide tipped, works for ordinary ceramic tiles | Works for Ceramic |
| Diamond Ceramic Drill Bit | Best for porcelain, glass, and dense stone | Best Choice |
| Tile Hole Saw | For large holes (e.g., faucets, sockets) | Excellent for Big Holes |
You see that diamond bits are the clear winner for porcelain. For softer ceramic tiles, a standard carbide tipped alloy drill bit will often suffice. However, porcelain needs the strength of diamond, especially when working on bathroom tile installation.
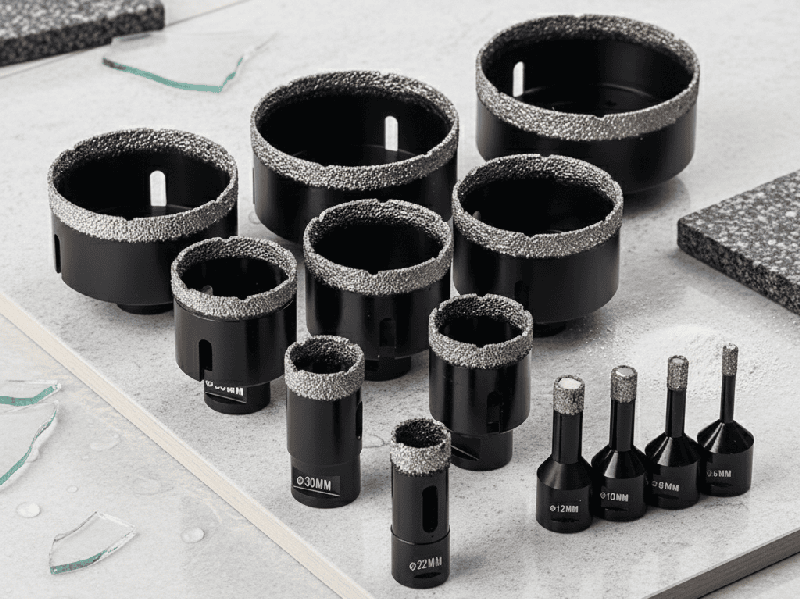
The Diamond Ceramic Drill Bit
For true professionals, diamond ceramic drill bits are the gold standard. They make drilling into hard materials efficient and clean. This is the only way to reliably drill porcelain without a crack.
Brazing Process & Diameter Range
The manufacturing process is key to bit performance. Use high-frequency brazing for maximum durability. Standard diameters range from 3mm to 20mm. We can also customize drill bits up to $50mm for large holes. These are necessary for things like pipes and plastic socket installation, where you’ll be working with screws, flanges etc.
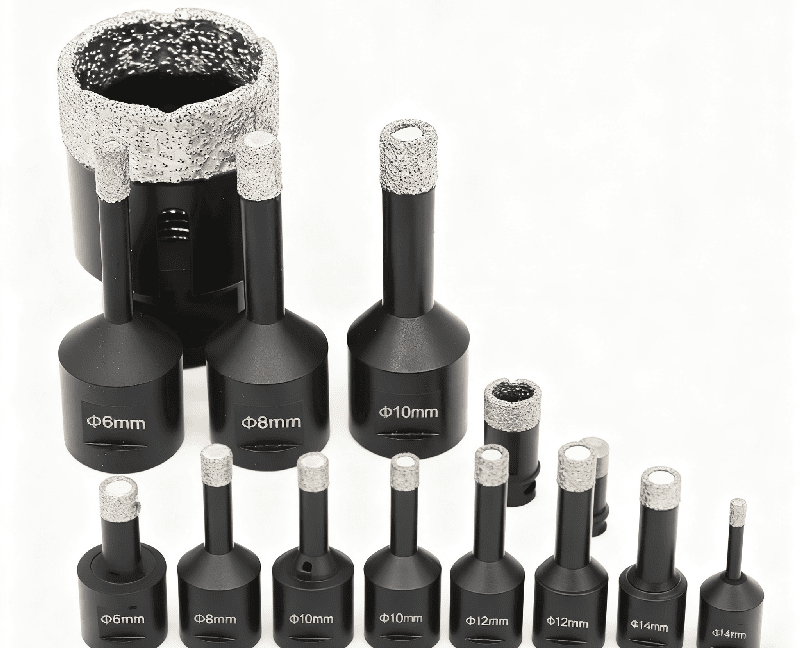
Shank Options for porcelain and ceramic tiles
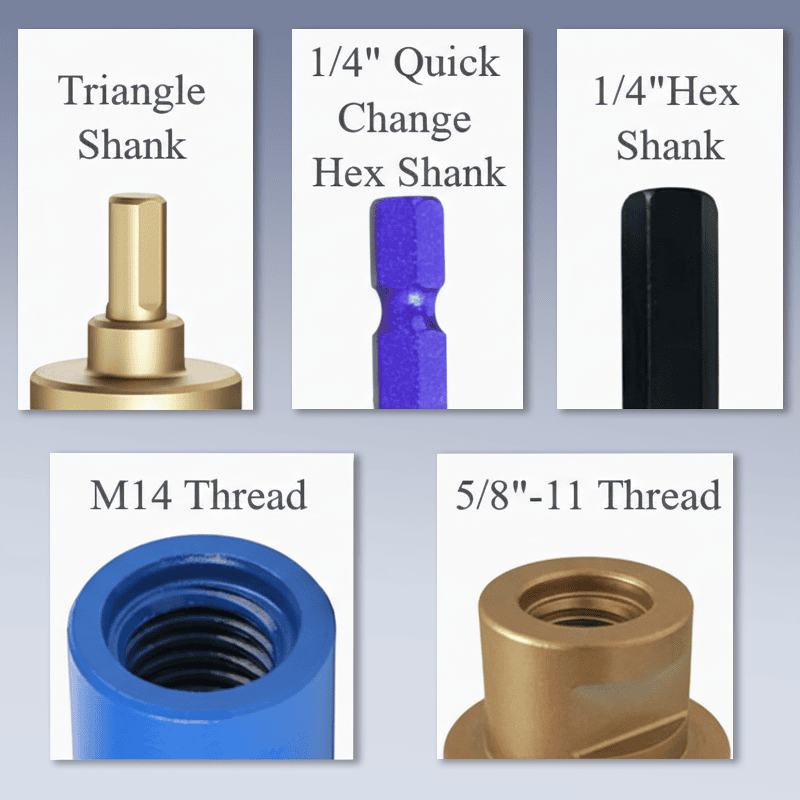
You can choose from several shank options. Standard (SD), Hex (HEX), and Quick-Change (QC) types are available. This means they are compatible with over 99% of the drills on the market. No extra adapter is ever needed.
Tip Design
The sharp tip design focuses on efficient drilling for ceramic tile drill bits. Our ARIX spiral tooth design is superior. It features 30% wider chip removal channels. This reduces filled dust clogging during continuous drilling.
Diamond Quality
We use premium synthetic diamond grit for exceptional quality. The grit size is typically #80–120. This specific material ensures a crystal integrity of 95%. It also has a compressive strength of 3000MPa. This robust construction allows you to drill 15–20 holes per bit. This is a 50 longer lifespan than ordinary bits.
The core advantages of using diamond ceramic drill bits for drilling through porcelain are simple. You get fast drilling, a perfectly smooth hole wall, and a long cutting life. These diamond drill bits save you time and money on every job.
How to Drill Through Porcelain Tile (Step-by-Step)
Now you know what drill bit to use for porcelain tile. Let’s review the step-by-step technique. Following these steps precisely ensures you know how to drill through porcelain successfully.
- You should start by preparing the surface. Apply the cross tape and clearly mark the position.
- Next, you need to begin the drilling process. Don’t go full speed. Start drilling through porcelain tile slowly at low speed to prevent slipping as you take the notch higher going deeper. The low speed setting is crucial here. Let the diamond or carbide slowly grind the tile surface. Hold the drill firmly for a good grip.
- Once the surface glaze is slightly penetrated, you can change your approach. Increase pressure gradually once the glaze is penetrated. This takes a moment, but it is necessary. You can also slightly increase the speed to a medium speed. Continue with steady, light pressure.
- For large holes, you will need a special tile hole saw. Specifically, use a wet diamond hole saw. This method is sometimes called a Wet Tile Drill. It keeps the entire bit cool during the whole process.
- After drilling the hole through the porcelain, remember to switch. You will need a different masonry bit for the wall behind the tile. This prevents any unnecessary stress on the newly created hole’s edge.
How to Prevent Tile Cracking While Drilling Holes
Preventing a crack is the primary concern for any professional. A broken tile means wasted time and materials. Use these porcelain tile drilling tips to avoid any damage.
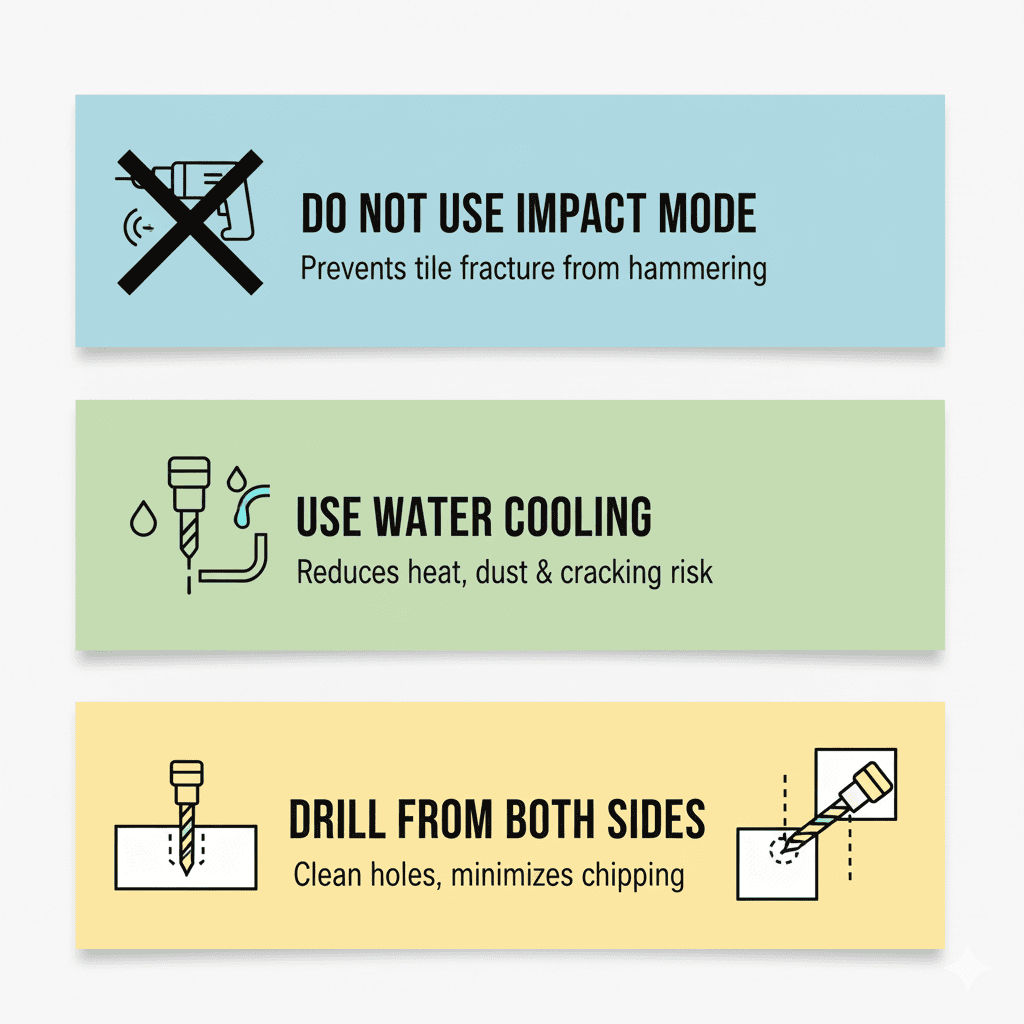
- Avoid using hammer drills. Hammer action is unnecessary when drilling porcelain and can crack the tile. Stick to a standard electric drill with a low speed setting.
- Apply water cooling. As mentioned earlier, cooling the drill bit with water will keep the bit cool and prevent the tile surface from overheating even in rotary mode. Have a small spray bottle for spraying water to cool it. Keeping the drill bit cool reduces the risk of cracking.
- Drill from the surface. Start drilling from the front of the tile to ensure that the drill bit enters smoothly. If needed, continue drilling from the back to create a clean hole with a drill press.
Always check for debris and dust from tile bits. Excessive build-up will create friction and heat. Keep the working area clear to ensure smooth, continuous drilling.

Conclusion
You now know the professional technique for drilling through porcelain. The process requires a methodical approach. It demands the right drill and the correct drill bit. You must never forget the importance of water to keep the bit cool.
At JohnsonTools, our diamond drill bits are engineered specifically for demanding porcelain tile drilling. We eliminate common issues like chipping and slipping. Johnson Tools products are trusted by professional contractors everywhere.
Our diamond bits deliver precise drilling holes every time. These high-quality bits are trusted by professional contractors for their durability and precision. You get faster drilling and a perfect finish. Don’t let poor-quality tools ruin your tile work. Get the right drill bits and drill through porcelain professionally.
Our diamond drill bits deliver minimal chipping and maximum durability per hole. We want to partner with you to make your next install job a seamless success. We provide the tools for your success. Contact us today for free samples or wholesale quotations.
FAQ
1. Diamond Blades: Quality Control and Performance
Q: Why is factory diamond blade quality control (QC) essential, and how does it prevent blade failure?
A: Industrial tool sourcing requires strict safety standards. Rigorous laboratory tests, including blade tension testing and segment weld strength tests, eliminate the catastrophic risk of wobbling or segment loss on job sites. By evaluating peripheral speed (RPM) and metal bond matrix wear, premium manufacturing protocols ensure an optimal balance between blade lifespan and cutting efficiency across demanding materials like granite and reinforced concrete. Partnering with a verified manufacturer ensures every batch delivers consistent wear resistance and absolute structural integrity.
2. Porcelain Tile Bits: Drilling Without Cracking
Q: How can I prevent drill bit wandering and thermal shock tile cracking when drilling large format porcelain slabs?
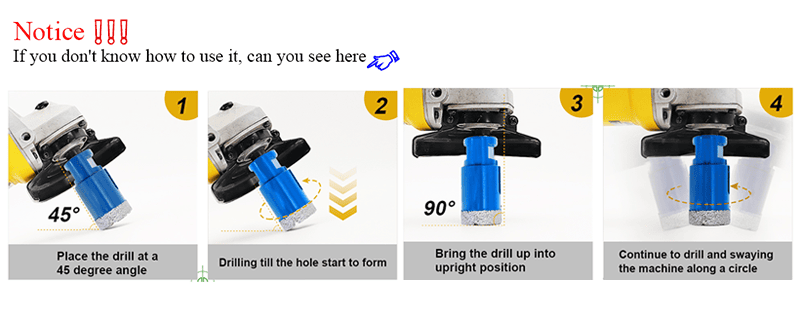
A: To prevent drill bit wandering and slipping on tile, never start your drill perfectly flat; instead, hold your M14 connection angle grinder or hex shank drill at a 45-degree angle to carve an initial crescent-shaped groove before pivoting to a 90-degree angle. Extreme friction can cause overheating and burning the bit, which instantly melts the diamonds and leads to thermal shock tile cracking. To master heat dissipation, use vacuum brazed diamond core bits featuring cooling wax for dry jobs, or maintain a continuous water flow when using standard electroplated diamond hole saws.
3. Multi-Material Blades: Rescue and Demolition
Q: Can I cut metal and concrete with the same diamond blade during emergency extrication or heavy demolition?
A: Yes, provided you use the correct specification. Utilizing advanced vacuum brazed technology allows operators to seamlessly transition from cutting through concrete and rebar to slicing through wood with embedded nails and high-density auto-body metals without switching blades. Vacuum brazed rescue blades provide unparalleled high-speed, multi-material cutting without water. Unlike traditional abrasive discs that shrink and emit hazardous debris, these blades retain their full cutting depth and are the ultimate extrication tool for time-sensitive emergencies.
4. Oscillating Tool Blades: Maintenance and Sharpening
Q: Can you sharpen oscillating multi-tool blades, or is it better to replace them?
A: Standard HCS (High Carbon Steel) blades featuring an aggressive Japanese tooth profile can be re-sharpened using a fine triangular diamond file or a specialized oscillating sharpening jig. However, attempting to sharpen carbide-tipped options or diamond grit grout blades is highly inefficient and counterproductive. Grinding these surfaces will permanently strip away the unique coating or fracture the carbide teeth, drastically accelerating blade overheating, reducing cutting performance, and causing tool motor damage. Replacing worn-out accessories with premium bi-metal (BIM) oscillating blades yields far better cost-efficiency for commercial contractors.
5. Diamond Core Bits: Slurry Evacuation and Interfaces
Q: What is the role of a water supply system in wet core drilling, and how do I match the right connection adapter?
A: In wet coring, water does much more than act as a coolant—it is the primary vehicle for slurry removal. Without a steady water supply system flushing the ground concrete out of the kerf, trapped debris acts as a secondary abrasive, prematurely wearing down the steel barrel and causing the bit to bind. When selecting a bit for your specific machinery, rig-mounted setups typically utilize industry-standard 1-1/4″ UNC thread core bits to handle immense lateral torque, whereas modern handheld motors frequently utilize a standard 5/8″-11 threaded core drill bit connection.

